Sunday, July 31, 2011

PROJECT: Seating Area Chairs

I have another furniture redo to share with y'all. I picked up these awesome chairs last year at an estate sale. Everyone who saw them sitting around my house was skeptical, but after finally transforming them I am sure they will be a big hit! I love the intricate funky backs and they are the right size and height to sit perfectly below our front living room area as a little seating area. Here is what they look like now.


Here is a photo of what the chairs looked like before the transformation.


The cushions were still in good shape so I decided to just cover them with a new fabric to hide the retro fabric that they came with. I would love to be talented at reupholstering (anyone know where I can take a class in Birmingham?) but for this project I just had to wing it.

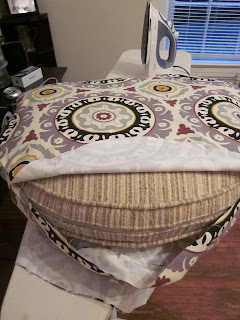
I traced around the cushion and added an inch for seam allowance to get the top and bottom pieces. I also cut a strip of fabric to be the sides of the cushion and chose the size of this by measuring how wide and long it was on the original cushion.

I sewed the long edge of the strip around the top piece, right sides together. I sewed the other side of the strip to the bottom piece, leaving a 2 ft opening so I could turn the cover right side out and put it over the cushion.


Then I sewed the opening shut. I didn't have zippers long enough for this and knew I would never actually take these to get cleaned so instead of making them removable, I made these permanent slipcovers. They didn't turn out wonderful but I think they do they job and no one is going to look close enough to witness the imperfections.

For the chairs, I deglossed them then primed and painted them with spray paint. I used a color from Rustoleum called winter gray. I loved the color on the cap but once the chairs were finished and inside I worried they looked a little light bluish. Here is a photo of the chairs after paint, but before glaze.

The paint did a lot for these chairs but what really made them look superb was the glaze process I did next. This was my first time using glaze but I had been wanting to try this for a long time. I watched this video on glazing from one of my favorite blogs to get tips on the technique. I used Valspar tintable glaze from Lowe's that I had tinted black.

Here are a bunch of photos of the finished product, after the glazing. Pictures really do not do these justice. The glaze makes all the details pop wonderfully and they look so antique-y and beautiful. Other than the slightly bluish tint they have, I am thrilled with the results. What do you all think?


I am off to continue ruining my nails with chemicals, paint and sanders :),

*Bonnybee

Saturday, July 23, 2011

PROJECT: White Shabby Chic Dressers

Today I have a furniture redo to share with you that I am totally psyched about. Getting settled in Birmingham is going well but slowly. We spent several days this week at Tim's family reunion so we still have spent less than ten days total in our new place. While we are unpacked, the decorating is going slowly. Yesterday we finished redoing the dressers for the master bedroom which took forever but were totally worth it. Here is the final product which is sitting in our bedroom. Read on to see how we did it.


Here is a picture of the before dresser (the pic is of just one but I have two identical ones that my mother let me take from her house)


This transformation was done in four main steps:

1. Degloss the furniture. Recently from another furniture redo-er I learned about liquid deglosser (see photo below) This stuff is awesome. Instead of sanding off an old finish you just apply this product and it prepares the surface to be painted. It is pretty strong stuff so make sure to do it in well ventilated area or outside, wear a protective mask, gloves and goggles and read the directions. Overall you just wipe the furniture down with a rag dampened with this stuff, let it dry and you are ready to paint!


2. Paint. I brushed on two coats of Valspar's Muslin Wrap from Lowe's. I painted these pieces by hand because they were large pieces and because I wanted to match the color to a bed that I had purchased for the room. (Pictures of the bed to come later)

3. Distress. I got my shabby chic look by distressing the drawers and dressers with sandpaper and power sanders. I am still working on my technique but what I suggest for people wanting to try it is don't stress too much. Just try it! Start with a little sanding on edges and corners and keep going until you get a result you like.

4. Protective wax coating. Lastly for a protective finish I used the same paste wax as I did for the farmhouse cart coffee table for a protective but not shiny finish.

Because there were two large pieces, they had to be carried in and outside, it rained one day and multiple other factors these took awhile to complete. At times my boyfriend asked "Why didn't we just leave them brown again?" but now that we are finished, we are both thrilled with the results. Here are some more photos of the final product.


Please let me know what you think in comments below and stay tuned for more furniture redos and decorating adventures!

*Bonnybee

Friday, July 15, 2011

Adorable Flower Headband Photos As Promised

Back when I did this blog entry about making flower hair clips I said I was going to give a large portion of them to my boyfriend Tim's adorable niece Gabriella and would hopefully share pictures later. Well finally I have some photos to share with you! While we were babysitting one day I took these photos and Tim's sweet sister was fine with me sharing photos of her gorgeous child. So here they are! Make sure to make some flower clips yourself to gift to a little girl in your life.


I will have some dresser redos for you soon. I tried to finish them today but it started raining while I was outside sanding!!! Here's hoping for a sunny next few days,

*Bonnybee

Tuesday, July 12, 2011

PROJECT: Farmhouse Cart Coffee Table

Well it is official I am now a resident of Birmingham, AL! We moved this weekend and are in the process of getting settled in (internet was hooked up today). I have plenty of time until classes start in August to get moved in and decorate our new place! Because of the move I have some blog entries I need to catch up on and some projects to share but for today I have the first of many projects from my new home to share.

I saw a photo of this table and knew it had to be mine! It took a lot of work but I think the finished product is worth it. Read on and tell me what you think.

Here is the original photo I found (It links to the website with building instructions)


Gathering the materials for this project turned out to be a challenge. All the wood was easy to buy and cost around $60 but the antique metal casters were so hard to find! I didn't want to settle for new or rubber casters, I wanted the full on antique rustic farmhouse look so I went on a hunt. I looked at antique stores, salvage stores and websites to try and find antique metal casters but I could not find the size or quantity I wanted. I was able to find some from a seller who buys the wheels new and antiques them himself, but they sold for like $150 for a set of four so I decided to antique some myself. I had to go to several places to even find new ones (they were way to expensive to buy online and ship) but I finally found them at a tire and caster warehouse in Nashville, TN when I was there for the weekend. I paid $60 for a set of 4. Anyways if you want to attempt to make this table you must make some hard decisions regarding you wheels.

Since I bought new wood and new wheels I had to fake that weathered, antique look myself. Building that table was a cinch and only took a few hours one afternoon. Then to give the table a weathered barn wood look I followed these instructions I found online. All it takes is staining the wood with some tea (brew it plenty dark) then applying a mixture of vinegar and steel wool (combine vinegar and pieces of steel wool in a glass jar and let it sit overnight) After applying the vinegar mixture, let is sit in the sun for 30 minutes and watch the cool transformation before your eyes!

Antiquing the wheels turned out to be much much harder. We followed the instructions found on this website but this process was not as easy. Although Tim (my wonderful boyfriend took on this responsibility which turned out to be the hardest part of the entire project) applied the paint stripper according to the directions several times, he still couldn't get all the paint off the wheels. It really was a pain so if I ever attempt this again or can offer you any advice - only get wheels that ARE NOT PAINTED! After that we followed the degreaser, vinegar and rusting mixture steps and got some nice nasty rusty wheels that I was ecstatic with. However the frames must have been made out of some sort of stainless steel or something that won't rust the same because we couldn't get them to rust no matter what we tried. We got some of the shininess off them and although they are still silver and not rusty, they look nice and weathered. Now I am sure you are sick of just hearing about it so here are some pics.

Here is a before shot of the wheels.


And a before shot of the frames.


Here is the paint stripper step.

Constructed table before antiquing.


To protect the table we applied a paste wax coating on top which will leave it with a hard protective coating but isn't shiny.


Here are the finished casters being attached to the table. (We coated the casters with several coats of spray polyurethane)


And here are some photos of the table in the living room of our new home.


We have only been here two days so there is still a lot of decorating to do but I am just thrilled with our new table. Right now I think it is my favorite thing I have ever made. Pictures do not do it justice...I wish you all could see it up close! Thanks to everyone who helped assemble, hunt for wheels for, move, or antique this project.

Please let me know in a comment below what you think of the finished product!

*Bonnybee

I'm linking up here...


The DIY Show Off

Monday, June 27, 2011

PROJECT: Refinished Entryway Bench

Hello all! My apologies for my absence but I have had a busy few weeks because this Saturday I will be moving to Birmingham, AL for graduate school! I will be moving into a beautiful historic apartment and I am going to spend the next several months decorating it. This decorating process will be dominating my blog and a lot of my projects will consist of refinishing furniture so this post is a little teaser for y'all.

Last week I visited my father in Atlanta and seeing an awesome old bench (once belonging to my great grandmother) that was looking to be refinished, I jumped at the opportunity. After a day of fun family work here is how it turned out.


This redo was super easy so I will walk you through the steps in case you have a piece you need to breathe some new life into.

We started out with a piece that had great bones but a well used (read: somewhat nasty) seat.


First step was to pop off the seat. For this piece we just had to remove 4 screws from the bottom (make sure to keep these for putting the piece back together at the end).

We continued the demolition by removing the upholstery nails which hold the fabric and batting down.


We then proceeded to sand the wood bench and then spray it with a few coats of primer and burgundy spray paint. Between coats we reupholstered the seat.


Cut the fabric (I scored some awesome dandelion decor fabric for 50% off at the local Hancock Fabrics) a few inches wider than the plywood base. I added one layer of foam padding between the fabric and the plywood base for just a little cushion.

We then pulled the fabric around to the bottom of the board and stapled. To see this done before, check out when I did an upholstered headboard.

Now back to the bench. After the paint dried I did some distressing. I used medium to fine sand paper and tried to focus on spots that would naturally get the most wear (extra sanding on the corners but leave the insides be)


Lastly I just flipped the piece over on top of the seat and screwed it back on. Thank you to my father and Denise (who loved the end result) for giving me free reign to redo their bench and to my bf for helping out with the transformation. What do y'all think of the final results?


Do you have some furniture refinishing projects to do this summer? Would you like to come help us with all ours?

*Bonnybee