Tuesday, May 15, 2012

Looking Forward to - Wedding Favors!

I tend not to share much about my personal life on this blog but as it will be influencing the projects I do in the upcoming year greatly, I wanted to share that almost two months ago, I got engaged! My wonderful fiance Tim (whose helping hand and adorable face has made an appearance on this blog a few times) and I have been best friends for many years and will be getting married in May of 2013. I am so excited to plan our special day and will be sharing all of my DIY goodies on this blog along the way.

One aspect of the party that I want to add my personal touch to is the wedding favors. Below are just a few fun ideas that have caught my eye on Pinterest.


Homemade Vanilla Extract
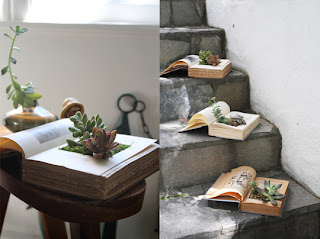
Succulents


Wine Corks

Handmade Soaps

I am picturing a fun shabby chic desk with lots of character hosting a beautiful display of a collection of goodies where guests can choose the perfect souvenir for themselves.


 What do you think? Which of these favors would you choose? Do you have other ideas? Can't wait to share this journey and all my decor ideas with all of you!

*Bonnybee

Wednesday, April 18, 2012

Bracelets for Blair

Well technically these bracelets were made for children in Ethiopia that Blair is going to visit but I am a sucker for an alliteration. Today I want to share with you a fun project I participated in through a blog I follow. I am a huge fan of Blair's blog A Case of the Mundays. Awhile ago she posted about a trip she and her husband will be taking to volunteer in Ethiopia. They will be bringing soccer balls and bracelets to give out to the children there. In this post I am going to share why I think this is such a wonderful idea. Check out the post about her trip here (and if you are feeling crafty make her some bracelets!)


{The bracelets I sent Blair}

In the summer of 2008 I spent a large chunk of my summer volunteering in Tanzania with people affected by HIV/AIDS. It was a life changing experience (the details of which I won't get into here). During the five weeks I lived there I got malaria, got very lonely at times (I went all by myself) but more importantly I met inspirational people that changed my life forever. I was shocked at how people that I thought needed so much help were incredibly strong, resilient and tremendously loving.

I wanted some kind of gesture that I could do for these people that had inspired me. So, being the crafty person that I am, I decided to make them something. Now I was in a rural area (sorry, no Hobby Lobby here!) so finding supplies wasn't easy. After a long time of searching I found some colored cord at the local market and I took off making a few dozen bracelets. I was even asked to teach the women at the community center how to make bracelets because they thought they could sell them for income. Also a new friend there insisted on making a bracelet for me and I came home wearing a bracelet of my own that stayed on my wrist for more than 3 years.


{New friends wearing the bracelets!}


{Teaching how to make bracelets}


Making and giving these bracelets is one of my fondest memories from this trip so as soon as I read Blair's post I knew I had to get involved. I made some bracelets out of the same cord I purchased in Tanzania and sent them to her recently. She mentions receiving my package in this post!


{My cord from Tanzania}

This fun blogging experience was so exciting for me. It also made me think a lot about my experience in Tanzania and for that I am grateful.

What do you guys think? Have any of you volunteered and brought fun personal gifts with you? Are any of you off to make some bracelets? I sure hope so!

*Bonnybee

Sunday, February 26, 2012

Book Projects

In my first post of the year I gave a sneak peak of a book planter that I made for my father. My father is a book lover and actually a published author who writes about books and book culture. (Check out the Bookshopper website!) As a belated birthday gift I made the following gifts from repurposed books and he thoroughly enjoyed them.


The bookmarks are an idea by my father to promote his book and blog. I gathered some beat-up old paperbacks at the used book store for cheap and covered the fronts with the Bookshopper info and contact paper. Of course I had to be sure to include books from well respected authors... bookmarks of silly romantic novels would tarnish the Bookshopper name!


I wanted to break down the steps of the book planter in case any of you all want to try this fun and unique project!

The original idea came from this website.

This project is simple but does take some work. First you find a hard cover book to transform. Next cut an opening for you plant to go in. To make this process easier I glued the pages together along the stacked pages side with regular craft glue. The opening should be a few inches wide and deep enough to fit your plant in. Sidenote: the best plants for this project are succulents which need minimal watering because there is no drainage in these. I cut through the pages with an exacto knife. It was a messy process and took awhile but definitely worth it.


After the hole is deep enough, you need to water proof it. I sprayed some spray adhesive in the hole and lined it with plastic wrap. I tucked the plastic wrap ends under the first page and glued it down so you wouldn't see any of it. (Sorry no pics of this step) Next add soil and your plant. I also added some decorative moss because I like the look of the soil covered.


So what do you guys think? I was so jealous of my dad getting to keep it in his living room after I saw how cool it turned out. Making another one for my apartment is definitely on my list of things to do. Any of you wanna make one?

Until next time,
*Bonnybee

Sunday, February 5, 2012

Easy Wall Hooks

This project is a fun and easy one to make some custom hooks for your place. I had a lot of scarves, belts and other accessories I needed a place for in my closet so I made these hooks.

To make a set of hooks like this you need a wood board (I used a 1"x8" pine board), a piece of wood trim the same length as the board, finishing nails to attach the trim to board, paint and hooks.

I lined the wood trim up with the top edge of the wood board and attached it with wood finishing nails.


Next paint the board. I used Annie Sloan Chalk Paint in Paris Gray with a dark glaze over it. I had purchased this paint to redo a vanity (pics to come of that soon!) and wanted to practice my techniques before starting on the big piece.


Last, attach the desired hooks to the board (mine came from Hobby Lobby and I love the weight and look of them). Then hang the hooks on the wall and start organizing!!

What do you guys think? There are so many options of shapes, colors and sizes to make your own wall hooks, I won't ever be purchasing them again!

* Bonnybee

Saturday, January 28, 2012

Distressed Wood Sign

Today I want to share with all of you a sign I made for my mother for Christmas.


My mom, like me, is a huge dog lover. At the end of a long day I love coming home and cuddling up with this guy...
So I thought a sign like this would add some cheer to her wall. Making a sign like this is super easy so here is a tutorial on how you can make your own.

First you need a piece of wood. I had a scrap piece of pine lying around that was the right size but you can use plywood, scraps or whatever you prefer since it will be painted. Also if you don't have a saw you can get the nice gentlemen at the hardware store to cut the piece to size before you buy it. I spray painted my board white to start with. (painting with acrylic paint and a brush would work just as well)

Then I cut out letters with my awesome Silhouette machine and stuck them on the wood. If you don't have a cutting machine you can use peel and stick lettering from the craft store.

With the letters on I sprayed two nice coats of flat black spray paint over the piece. After letting that dry I carefully peeled off the letters with some tweezers to reveal the clean type. I then used my orbital sander (again, for those without, sandpaper and some elbow grease will work the same) and distressed the edges and a few spots to give it that worn in look.


I was thrilled with the results (and so was my mom!). I love the look of these signs...I want to try some with pallet wood, and am thinking there is a perfect spot for one in my bedroom! Any of you think you would like to try this easy weekend project? What phrase would go on your sign?

As always, I would love to hear from you in a comment below. I'll be back soon with another project so be sure to check back!

*Bonnybee

Wednesday, January 11, 2012

Wire Basket Pendant Light

In this post I am going to share a project that I love, love, love! I've seem handmade lighting made out of industrial parts, baskets and all sorts of reclaimed objects so I was really excited to try one of my own.

I used a vintage wire basket and turned it into a pendant light for our shabby chic bedroom. To make one of these you will need the object you want to make the shade/light and a few things from the hardware store. As this was my first attempt, the staff in the electrical department at Home Depot were very helpful finding what I needed (so just ask if you can't find this stuff!). The first photo is of a push through on/off socket. You will also need a swag light kit which comes with cord, and a few other items to hang your light.


The socket goes on the inside of your basket and you push the top up through the base of the basket. We followed the instructions on the packages to see how to strip the end of the cord and attach the two ends of the wire and attach this to the top of the socket. To make sure we did it right I stuck in a light bulb and plugged it in. As you can see -- there was light!

I was really excited to get it hooked up. Unfortunately we had overlooked something...

I forgot to weave the chain through the cord before attaching it to the socket and basket! You need to weave the cord through the chain because once you attach the cord to the socket piece, the other end of the cord (the part that fits into the wall outlet) is too large. Thus we took it apart and fixed our mistake.

*side note* I am saying "we" in this post meaning my wonderful side kick and boyfriend, Tim. We have been tackling all sorts of projects together in Birmingham for "our home".

Once completed, we hung the chain from a hook in the ceiling (came in the swag light kit). As renters, we could not wire for this light but simply ran the cord down the wall to an outlet and covered it up with white duct tape so it is barely noticeable.

I love the light and character it gives the room!


I am so happy with how our first refurbished pendant light came out that I want to make another one. Here are some other inspirational lights I found on Pinterest:

Clockwise from top left : 1|2|3|4


Do you have any ideas for objects that could be used for this project? Would you like to have one of these in your place?

*Bonnybee


I am linking up here:


Photobucket

Tuesday, January 3, 2012

A New Year of Blogging!

Well I have been absent from the blog world this fall and now it is time for a reappearance! My last post included some furniture redos for our new apartment in Birmingham. I moved to Birmingham to attend UAB and earn my Masters in Public Health. I had every intention to keep blogging but with adjusting to a new city, being busy with a job and a full time grad school course load, I simply did not get around to it.

Well I have completed (and thoroughly enjoyed) one semester but have missed sharing my projects on my little blog! Although I may have not been posting, I have still been DIYing and in this post I will share a few photos as a preview of what I have been up to the past few months.

{ a book planter for my father's birthday}


{living room curtains, a.k.a. my first attempt at curtains ever}


{ruffled diaper covers}

{old cabinet drawers repurposed into shadow boxes}

{a set of hooks in my HUGE room turned closet}


I will be returning with more photos and tutorials for some of these projects (any you are particularly excited to hear about?). I also have a long list of more projects to tackle in 2012 so I look forward to sharing those as well!

*Bonnybee