Tuesday, November 30, 2010

Handmade Christmastime

The holidays are one of my favorite times of year because I go on a crazy crafting spree. Majority, if not all, of my Christmas gifts are handmade by me and they are my favorite gifts to give. (The reaction of those who receive them also makes me think that they enjoy my gifts just as much. However I suppose my family and friends could just be very good actors!)

This is my first Christmas season having an etsy store and selling my handmade goods for others to possibly give as presents. Even though I make so many things, I love shopping other handmade artists at craft shows, when I travel, and on etsy because I think there is something so spectacular about buying handmade goods and supporting that culture.

One of my absolute favorite blogs to follow, Scoutie Girl, is all about creative living and mindful spending. Their blog supports handmade goods because they are wonderful, but also because there are social issues that we can act intentionally on through supporting handmade culture. A recent blog entry addressed giving handmade gifts for Christmas --

"Buying handmade items as gifts, during the holidays or anytime of the year, is a win-win-win situation for the giver, the receiver and the maker.

As a consumer, buying handmade gives you great power – the power to directly affect the life of another human being."

Click Here to read the rest of this blog entry or to browse ScoutieGirl.com.


So for the month of December I will be sharing all the handmade presents I am working on and hope it will inspire some of you to make your own gifts or to purchase handmade items this season!

My first handmade gift idea will come tomorrow but to tide you over until then, here are some ways to browse handmade now.

Threadbanger.com (another great site for the crafter) had this great blog entry featuring holiday gifts from Etsy.com.

I browsed Etsy last night to bring you a little holiday gift gallery a la Bonnybee (click on the picture to link to the item). It is amazing how many wonderful items are out there!

personalized stationary from jessicawood


Gotta love those 'staches! A field guide to Typestaches: poster by oldtomfoolery


A perfect gift for the knitter/crocheter in your life...beautiful handspun yard by weetsie.


I am in love with these gorgeous rings made
of uncut, conflict free diamonds by JanishJewels.


I love this clock for that techie boy who can be hard to shop handmade for (a.k.a. my bf). Clock from computer hard drive circuitboard by pixelthis.


After seeing this tote for the first time I creeped around the marina, asking my friends who own sailboats where I could find old sails... Custom recycled sail big tote by reiter8.


I can't help but plug my own etsy store for some handmade Christmas gifts. These leather beaded wrap bracelets are really popular right now and would make great gifts!


Probably the cutest butter dish I have ever seen from PaisleyHillDesigns.

I hope you all have enjoyed this post and are ready to do some Christmas shopping! Will you be buying or making handmade gifts this year? I would love to hear what you have planned!

*Bonnybee


Monday, November 22, 2010

PROJECT: Jersey Circular Scarfs

These scarves are an easy, fun and very stylish craft for any level seamstress to try. This project was extra special for me because I had a craft date with my childhood friend, Alyssa, to make these. Like me, Alyssa loves crafting, she has her own etsy shop where she sells adorable hair accessories, and a blog, mice & birds, where she shares her life-loving adventures.

Here is Alyssa fashioning the one of the finished scarves


And here we both are wearing the scarves in a classic "friends take a photo in the bathroom mirror" photo.


Now for the tutorial!


Well you can make this scarf with whatever amount of fabric you wish, making it long and skinny or short and fat, or whatever dimensions you desire. It is all the same construction which is basically an endless tube of fabric. However I will share what dimensions of fabric we used. For our first attempt, the dark green scarf, this was a much thinner, stretchier jersey and the starting piece measured 29" wide by 77" long. For the orange and white stripe (or creamsicle fabric as we called it) it was a much thicker jersey knit and we wanted the scarf to be much longer and fuller than the first. The measurements of the starting creamsicle fabric was 34" wide by 90" long.
Note: I find that the stretcher a fabric is, the harder it is to work with. This really stretchy jersey was harder to measure and cut and harder so sew up the edges evenly. Fortunately since you are making a big continuous tube you do not have to worry as much about your seams being exact!

The first step is to fold the fabric long ways (hot dog style) with right sides together and sew up the long end. You will now have a long tube of fabric with open endings.


Here is creamisicle scarf in the big long tube stage


Here you can see the open ends after this step


Next turn the scarf right side out and match the two open tube ends together. Do this by lining up the seams, right sides facing. Now sew around the circumference of the tube ends. You will not be able to sew completely around, so leave the last few inches and sew these up by turning raw edges in and sewing by hand.


The above picture shows the two tube ends lined up and ready to sew.

Sorry I do not have a good photo of closing up the remaining opening, but it is very similar to closing the remaining opening on a pillowcase. And after this is complete the scarf is done!

The project is really easy and it probably takes a little longer to complete when working with a friend, but can be much more fun that way!


Here are our sewing machines, which of course are now buddies, and another photo of us enjoying our new scarves.

Click here to read Alyssa's blog entry on crafting with friends.

Will you try these scarves yourself? They would make wonderful Christmas gifts! I would also like to know, do any of you have crafting friends whom you do projects with? I would love to hear form you in comments below.

Staying warm and stylish in my new scarf,

*Bonnybee


Wednesday, November 17, 2010

Giveaway on Wild and Precious!

This week one of my Leather Beaded Wrap Bracelets is being given away on my friend Blair's awesome blog, Wild and Precious!


So make sure to stop by, check out her blog, and follow the instructions on how to win this bracelet!

 blog_button_150.jpg


Also I have many more of this style of bracelet in my etsy shop so I invite you to browse there as well!


I spent last night sewing, so check back soon to see what was made!

*Bonnybee

Wednesday, November 10, 2010

PROJECT: Pedestrian Book Bag

I was recently commissioned to do a custom piece for a very important client, my father. Other than being a stellar dad, he is also a published author, blogger and a life long lover of books. He also takes public transportation to work in Atlanta and came up with this idea while dodging traffic on the way to the MARTA station.

He requested a tote bag that would not only be functional (durable fabric, crossbody strap and zipper to prevent spillage on the train), but also make a social statement. He wanted the bag to read "Thanks for not running me over" and be in bright, street sign like colors. This message could be read in a sarcastic tone for those drivers who almost run him over while crossing the street, or in a sincere tone for those who respect his right of way.

I am going to show you how I made this creation come to life. It actually proved to be quite a time consuming project because as I am not sure my dad realized, I do not have the means to make my own screen print! Thus my other options were fabric paint or pen (which I think can look amateur and not end up lasting) or what I chose, which was hand embroidering or appliqueing on all 25 letters.

To grab your attention, here is the finished product.

Now for the tutorial!

This is really just a basic tote with a lot of applique and embroidery detail (Thus you can easily change the details to suit your taste)

First I started off with 4 pieces (2 for outside and 2 for lining) of bright orange ripstop nylon. I wanted a fabric that was bright, to catch the attention of the drivers, and durable so any mess form the MARTA could be easily wiped off. My starting pieces were 14" x 16" and I bought 50" of some black canvas strap. For the decoration I used black wax linen thread (because I found this in the closet before I found embroidery thread) and black vinyl.


The first task was to decorate the front of the bag. I hand sketched and cut out the appliques for "THANKS", the car, and the dodging pedestrian. I suppose a more perfectionist designer could easily print some stencils out and trace the patterns, but I knew what I wanted it to look like and thought I would try free handing it first. I sewed all the appliques on with a zigzag stitch on my sewing machine.


Next I did the smaller text by drawing it out with a pencil, then embroidering it on by hand using wax linen, an embroidery hoop, and a lot of care. I liked the dotted line look but next time might try a thicker line so it stands out even more.


Now, after more than an hour of hard work, it was time to construct the bag. Using the basic zipper technique I explained when doing cosmetic bags, I layered the fabric with edges lined up as follows: outer front of bag face up, zipper face down and inner fabric face down. (Obviously if you are using 4 identical pieces of material all you need to worry about is that your pretty embellishments are facing the right way). Next using a zipper foot, I sewed these three pieces together.


I repeated this step for the other side of the zipper. Again if this is a little confusing, check out my other cosmetic bag tutorials for more zipper explanations. After that I top stitched along the zipper.

I made sure to unzip the zipper halfway. Then it was time to turn both sides right sides facing each other and sew all around the outside, leaving a few inches not sewn in the lining to then turn the bag right side out.


I turned the bag right side out, sewed up the hole in the lining, and pushed out the corners. Lastly it was time to add the strap.


I finished off the raw edges of the strap with some more vinyl then sewed these onto the outside of the bag.

And this is how it turned out!


Here are some more photos of the happy client sporting his new bag.


To read his own personal review of the bag, visit the Bookshopper's blog!

What do you guys think? Did this project inspire you to sew or to read?

*Bonnybee

Monday, November 8, 2010

PROJECT: Halloween Accessories

Getting dressed up for Halloween is one of my favorite things to do all year. I love making my own costumes. However, last weekend I was not sure if I would be going to a costume party so I was afraid that this year, my costume ideas were going to remain in my imagination. However my boyfriend and I decided Saturday, October 30th, to go out that night so I need two costumes quick!

Below you can see what we came up with --- A Shotgun Wedding.


As I am sure most of you know a shotgun wedding consists of a bride and a groom who are forced to get married due to an unplanned pregnancy. I thought going as this would be a fun costume which would get lots of laughs. And I was right!

We had most of the components of the costumes already lying around. The groom wore a dress shirt and a black dress jacket and decided to stay with jeans to make it look even more rushed. I wore a long white lacy dress I owned and stuffed a fleece blanket under it to act as my "bun in the oven". We added a few other touches like rings and a bouquet and then I made a few accessories to complete the outfit. Here I will show you how I made a quick veil for the bride and a bow tie for the groom.


Bow Tie

For my groomie I used some black linen look-a-like fabric and did some research by reading this great bow tie tutorial from PrudentBaby.com. They do a great job of explaining several different patterns but below I will show you my interpretation.

The first step was to cut out my pattern pieces. These bow ties are made by making a long tube then folding it in half and cinching the center to make a bow (you are not actually tying a bow).


I cut two pieces of my fabric which measured 12.5 inches (2 times my desired final width plus seam allowances) by 3.5 inches (my desired final height plus seam allowances). I also cut a 3in x 6in (desired final dimensions of bow tie) piece of fusible interfacing to add structure and a 2in x 3in rectangle to serve as the cinching piece later.

Next I ironed the fusible interfacing to the center of one my fabric pieces.


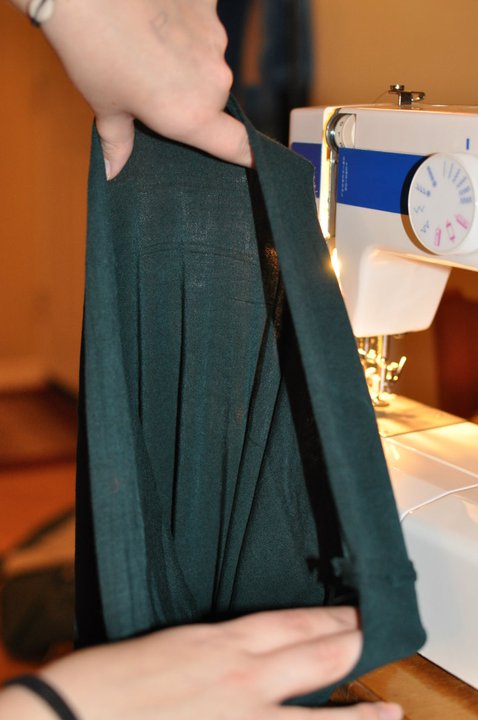
I then pinned the two fabric pieces right sides together and sewed around 3 of the sides (leaving one of the short sides open).

Next I turned the piece right side out and pushed out the corners. Then I sewed up the open end, first tucking under the raw edges.

Now I had a nicely sewn strap. I folded it in two, putting the short sides together and sewed along these sides. That made a loop of fabric which I folded flat with the seam at the back center of the piece. I ironed this flat.


Next it was time to make the center loop to cinch this rectangle so it would make a bow tie.

I did this by taking the 2in x 3in rectangle and folding it long ways with the raw edges touching each other. Then folded again so no raw edges were exposed. (Sorry because of the black fabric this is kind of hard to see)


I pressed this.
Next I turned this little strap into a loop by folding it right sides facing and made a circle big enough to fit around my bow tie but small enough that it would squeeze it in the center. I sewed where the pin is shown above to make the circle then cut off the excess and turned it right side out.

Above you can see my little "cinching tube" and my rectangle about to be transformed into a bow tie.


I folded the rectangle accordion-style length ways and slid the tube to the center of the rectangle.

I adjusted it a little to make it look pretty and I had a bow tie! This took me less than 15 minutes and it looked great. The tutorial I linked to above tells you how to make adjustable straps to attach these two but since mine was for a costume anyways, I just safety pinned it on my groom. I really like the idea of these for more than just costumes. Making them in the spring time with paisley or gingham prints could be really cute for little boys' church outfits (or if you go to college in the south like I did, they could be worn by any fraternity boy you know!). In the mean time this little black bow tie is going to be worn by my dog, Wrigley, anytime he is feeling fancy!


Veil

To complete my bridal look I wanted to make a quick and very inexpensive veil. I bought half a yard of ivory tulle ($1.25) at the fabric store and used a headband I made previously.


In case you like this headband, I sell one just like this, plus many others, in my etsy store! These come without veils of course :)


Next I folded the tulle in half (I wanted to be able to fold the front half in front of my face for a legitimate veil) and trimmed it to the length I wanted.


Lastly I hand sewed the folded edge of the tulle to the headband. I used big loose stitches because I wanted to be able to remove the tulle at the end of the night. This veil was super easy and took me less than 10 minutes. So, in less than 30 minutes total, our costumes were accessorized and complete!

We had a blast but I did scare a good amount of people who thought I was really pregnant. Apparently the fleece blanket was a little too realistic looking. I would love to hear about what some of you dressed up as for Halloween. Did you do anything crafty for your costume? Comments are very much welcome below.

Coming very soon are more fun blog entries to show what crafty things I have been up to. Just yesterday I got back in the pottery studio after being gone for far too long. I made several coffee mugs and am now thinking of what my next projects will be. I am thinking hand decorated plates, beer steins and some funky tea cups and saucers! I will make sure to share whatever comes out of the kiln.

In the meantime, happy crafting!

*Bonnybee