Saturday, December 22, 2012

Glass Jar Snow Globes

This year, because of lack of time, I kept my Christmas decorations to a minimum. But after running across some adorable mason jar snow globes at Anthropoligie, I decided my own version of glass jar snow globes would be my fun new decoration for the year. Mine don't have liquid inside but I think they came out cute enough to display proudly on my mantel.


Keep reading to see how I made them. Perhaps you still have time to make some of your own?!


1. Gather materials: Glass jars (I used a pickle jar, a salsa jar and a mason jar. You can use whatever you like, just make sure they have a wide lid and will not fall over when upside down), plastic trees, animals or whatever decoration you want on the inside, silver spray paint, white glitter and a hot glue gun.

2. Spray paint the lids silver.


3. Hot glue your decorations to the inside of the lid. To make my animals and trees better seen I added a few layers of cardboard (from the flap of a box) to the lid with hot glue. I also painted the "ground" white with acrylic paint in case it would be seen when the glitter moves. Both of these extra steps are optional. Let the glue dry.


4. Pour a generous amount of glitter into the jar.


<<CAUTION: DO NOT pick up the jar full of glitter and turn it over to show someone something without the lid on. Seriously this may sound too idiotic to even worry about but please see the photo below to show that it could happen! >>


 5. Without spilling the glitter, screw the lid tightly back onto the jar. Shake that snow globe up and enjoy your festiveness!


I am off to celebrate Christmas with friends and family! I hope you have a wonderful and relaxing break.
Happy Holidays!
*Bonnybee 


Wednesday, December 19, 2012

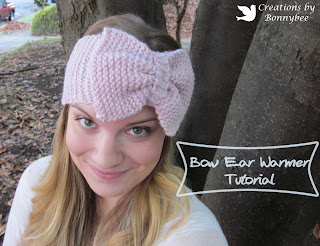
Bow Ear Warmer Tutorial

A few weeks ago a college friend of mine sent me a photo of an adorable ear warmer she thought I could knit for her. Never wanting to disappoint anyone who supports my craftiness, I got to work. I thought I would share a tutorial for how I did it because it was super easy and it would be perfect for some last minute Christmas gifts!


For supplies you will need some worsted weight yarn (It didn't even take me half a ball to make this), knitting needles (I used size 8), a measuring tape, a large hole needle, and some time relaxing on your couch.

This pattern only uses a basic knitting stitch so it is super easy and quick. First you need to knit three pieces for your ear warmer.

The longest piece is for the headband and is a long rectangle. I cast on 20 stitches and knitted until was the desired length. No need to check your gauge and you can use whatever yarn or size needle you want, just make the finished product 4.5" wide and 14" long. After you make this piece cast off and start your next piece. Next for the bow I cast on 22 stitches and made a rectangle that measured 5" wide and 6.5" long. And lastly a little piece (cast on 5 sts) that measures 1" wide and 4" long.

Now it's time to assemble your pieces. 


1. To make the instructions easier, I have labeled the pieces. A is the long rectangle that will make the headband. B is the piece to make the bow. C is the small strip that will tie everything together. If you haven't done it already, weave in all the lose ends of your pieces.

2. First take piece A and stitch together the two short sides of the rectangle. Do this with a new piece of yarn and don't worry about it looking pretty, it won't be seen.

3. To make the headband cinch in a little so you can add on your bow, pull the ends of your string that you just sewed with to gather the fabric a little. Then tie a knot with each end and snip off the excess. Again this won't be seen but you just need it to be secure because it will get tugged on when you stretch it around your head. 

4. Now we will work with piece B for a moment. With a new piece of yarn run a loose stitch through the middle of the rectangle and pull on the ends to gather it (like you did with the last piece). Don't pull too hard, just enough to where the rectangle transforms into a bow shape.

5. Tie off the ends by wrapping them around the center of the bow and making a knot.

6. Now it's time to put it all together! Lay piece B on top of piece A with the centers matching. Then take C and wrap it around the center of the two pieces. Stitch the two short ends of C together tightly and tie off the ends. Then slide the stitched up side of C to the inside of the headband so you can't see it. I also added one quick stitch through all three layers to make sure they all stay in place. 

You're done! Now you have a cutsie bow ear warmer that took hardly any time at all! If you aren't a big fan of the bow, leave out piece B and just make a cinched headband!


Any questions or suggestions for the tutorial? Any of you going to try this one out? Please let me know in comments below!

*Bonnybee

Wednesday, November 28, 2012

A Desk Redo and More 30 by 30


First I wanted to share a few photos of a desk I recently redid (and forgot to take a before picture of). This little pretty was refinished just to hold the favors at our wedding. Until then it is living next to our front door...


Next I want to share the next 10 items on my 30 by 30 list. For the first ten items and an explanation of this list see the first blog posting here.


11. Improve jewelry metal smithing skills and learn to solder. Soldering is something I have been wanting to learn forever! I have jewelry saws, metal files and other basic tools but now its time to break out the torch and get to work!

12. Learn to french braid my own hair. Although I can braid someone else's hair, lack of arm strength and patience has kept me from learning how to do my own. There are way too many cute hair styles out right now so I must get this task done before they go out of style.


13. Go on a cross country road trip.Tim is my absolute favorite traveling buddy and this is something we want to do while we are still in our 20s.

14. Become a grown up and get a "real" job with salary and benefits. For some reason I equate being a grown up with these things and will continue to feel like a big kid until I get my first full time job. 

15. Complete a sprint triathalon. Distance running has never been my thing and I can't ride a bike so swimming is the only event I currently could complete. However I love the idea of completing a sprint triathalon so think it is a great physical goal to set for myself. 

16. Return to Africa. Ever since spending the summer of 2008 in Tanzania and getting malaria before I was able to go on safari and visit Mt. Kilimanjaro, I vowed to return to East Africa and do these things and visit the orphanage where I volunteered again. 


17. Attend Bonnaroo. Every year I want to go to this music festival but never seem to get around to actually going.

18. Bake the perfect chocolate chip cookie. Before I become a mom I want to master a killer recipe for the best chocolate cookies so I can be "that" mom. Any recipe recommendations anyone?

19. Become proficient in Spanish. Any time I am taking a class or spend time in a spanish speaking country, my skills improve so much but as soom as I return home I always let me skills fade. I want to take a long trip or find a language buddy so I can master Spanish once and for all!

20. Sell Bonnybee Designs in stores. This is something I have wanted to do for a long time but never can seem to find the time to do. I have already been approached by a few stores in Birmingham so hopefully I am on the right track. But for now my jewelry can only be found in my Etsy store. 


So what do you guys think?! What are some of your goals?

*Bonnybee

Tuesday, November 20, 2012

Thirty by Thirty


This past Sunday I turned 25. This got me thinking about all the wonderful things that lay ahead of me in the next few years. It also got me thinking about some things that I have on my "someday" list that I want to accomplish while I am still young and (relatively) without responsibilities.  So I decided to make a list of thirty things I want to accomplish by the time I turn thirty. To provide accountability and since so many things on this list are crafty and/or exciting (at least in my opinion) I want to share my list on this here bloggie and share my progress on these goals over the years. 

Today I am going to start off by sharing the first ten items on my list....

1. Marry the man of my dreams. This item I am particularly excited about. My fiance, Tim, is absolutely the perfect companion for me and each day I am more and more excited to come home and see him. I know I am truly blessed to have found someone like him to spend my life with. Not to mention how much fun I am having planning and decorating for the wedding.


2. Learn to reupholster. So far my skills are limited to seats that can pop out but I want to be a reupholstery pro; able to do chairs with backs, cushions, arm chairs and someday even sofas. I have come up blank when trying to find classes in my area so am now determined to be self-taught-ish. As a birthday gift, Tim set me up with all the wonderful tools I need and I have already started collecting practice peices. Stay tuned to hear about my trials and tribulations along the way.

3. Get a furniture booth. For a long time now I have dreamt of getting a booth at a local shop where I can sell furniture that I refinish. I have shared a few of the pieces I have done for my home but I crave the opportunity to make more. 


4. Visit Southeast Asia. It has been far too long since I have traveled out of the country and my next destination must be to Thailand and Vietnam. Anyone wanna come with?!

5. Earn my masters degrees.This May I will be graduating with a Masters in Public Health and a Masters in Public Administration and I can not wait. 

6. Learn to ride a bike. You know the phrase "It's Like riding a bike?" I hate that phrase!! I rode bikes as a kid but become a wobbly unstable mess when I try to mount one now. I would love to be able to take weekend bike rides or commute to work but it is going to take a lot of practicing before I am comfortable on two wheels. For this reason riding a bike has always stayed on my "someday" list. 

7. Get crazy in Sin City. My wonderful besties are going to help cross this item off my list this Spring as they are planning my bachelorette party in Las Vegas. 

8. Throw an epic Halloween party.I love dressing up. My craftiness explodes when I am working on a costume. Unfortunately I never seem to make plans for Halloween and just end up staying home. Thus I am vowing to throw an epic Halloween party within the next few years complete with ridiculous decorations and costumes.

9. Buy a digital SLR camera and be able to use it. And I don't just mean turn it on and press the button. I want to say goodbye to out of focus photos with horrible lighting.

10. Have a ceramics studio again.Post college I inherited an amazing pottery wheel and kiln and had a wonderful set up at my mother's house. Currently in Birmingham I don't have the room in our rented apartment for a ceramics studio (crazy right?!). Before I turn thirty I want to be in a house with an unfinished basement or other space where I can set up my studio again. 

Well there are the first 10 items from my thirty by thirty list. Some of these I have already begun on and some I am not sure how I am going to accomplish. Do any of you have lists like this? If you did, what would be on your list??! Do you have any predictions on which of these items will end up making me cry?  Let me know in a comment below!

*Bonnybee


Wednesday, October 24, 2012

Book Page Lanterns


After being gone for awhile, I am back with a fun decor project for y'all to try! I am planning to use a bunch of these to decorate at our wedding so I thought it was time to try making them. I am thrilled with how they turned out so I wanted to share the super easy process so you can make some too!

Materials:
Japanese paper lantern
Old book pages
Hot glue gun
Scissors


 I cut the book pages into half oval shapes that were approximately 3 in tall and 4 in wide.


For each page I put a dab of glue on the lantern, attached the page, then added a dab of glue under each corner of the page. I continued around the row and overlapped each following page. After completing a row, I started the next row and overlapped at least half of the page. I found that overlapping the rows plenty gave the lanterns a more elaborate and full look.


Continue adding rows of pages until you reach the top of the lantern. To finish the lantern I laid some final pages around in a circle to cover the remaining space.


After your are done add some string (I used fishing line), hang and enjoy! I had a great time making these and am excited that I have started on some of our wedding decor!


Let me know if you try making these! I would love to hear about how it goes for you.

*Bonnybee

Sunday, August 12, 2012

Easy Fabric Wall Decor

I am slowly and surely working on our dining room. I have a wonderful painting that I purchased white volunteering in Tanzania back in college that I wanted to display on the wall. However it looked a little lonely all by itself so I crafted up a little decor to put on either side. 

Framing a pretty fabric is a quick and easy way to add pretty decor that is also friendly to your budget. I started with some frames a family member gave to me that she wasn't using. I painted them with some acrylic paint. Then I cut out some fabric to go in the frames. 


 That's my easy project for you all today. While I was at the fabric store I also got some fun trims that I was thinking I could use for some nautical bracelets. Would you all want me to show you how to make those??

*Bonnybee


Monday, July 23, 2012

Make a "brass" figurine


I love the look of vintage brass figurines. However they really aren't a necessity for me to be spending money on so in the mean time, I have decided to make my own look-a-like figurine. Here are some examples of the for real figurines that I love.

1 | 2 | 3 | 4

I saw a ceramic baby deer (I think that is what animal this is???) at a thrift store recently and knew it would be perfect for my brass transformation. To transform it I simply primed and spray painted it with metallic spray paint. I am super pleased with the result. Here is a photo of my little darling sitting in our dining room. 

   
So now I have a really important question for you readers. I really want a name for my new brass figurine....suggestions please??

*Bonnybee

Sunday, July 15, 2012

What I've Been Up To

It has been awhile since I have blogged. While I might not have had any big projects, I want to share some of the little things that I have been working on. Bonnybee Designs, my jewelry line, always keeps me busy. I am really excited about a custom order I am working on for a bridal party. They are wearing pale peachy/pink dresses and the bride has asked me to create a variety of similar but unique statement necklaces. I am having so much fun with these and here are some of the in progress photos. 
 
 Custom Order Bridesmaid Necklaces


Here are a few photos I snapped of some of the other pieces I was working on today.


Beanie Drive
 
I also participated in a Beanie Drive being done by Jess over at Epherriel Designs. She is asking crafters to make a beanie for her to donate to the chemotherapy unit where her father is getting treatment. I love it when bloggers/crafters get together for a cause like this so one night last week I baked some muffins (for sustenance of course) and got to knitting!

I put my yarn away for the summer so I had to dig I begged Tim to dig to the bottom of my craft closet for my bin of yarn.


 I made some chocolate muffins with canned pumpkin (idea found here on Pinterest) which were delicious with a glass of cold soy milk. I finished up the hat the next night and added a little note. On Saturday I packaged it up and sent my little beanie off to Australia!


I was so excited to take part in this beanie drive and if you are interested in contributing as well please visit Jess's blog for info!

My "New" Antique Sofa

I am constantly on the hunt for decor to use and furniture to redo for Tim and I's upcoming wedding. Having an antique sofa for a lounge area outside at the reception is a must for me. Originally I had planned on renting a sofa from an awesome rental place in Knoxville and only bringing some of the smaller items myself (chairs, sign in desk, etc). However, this weekend I stumbled upon an ah-mazing antique sofa with cream upholstery on sale for just $100 at a local flea mall. I seriously jumped up and down and was so psyched to find it. It costs this much just to rent one and this baby is in great shape (meaning comfy, sturdy, no stains or funny smells). Also I really wanted to do one of those sessions where you drag a piece of furniture out into a field for photos and now I have the perfect sofa to do this for our engagement photos!

The photo of me on the sofa is kinda blurry but I'm sharing it anyway because of the pure joy I was feeling at that moment. 


What do you think? Am I a complete loon for being this excited about this sofa? Tim was even excited about it so I am pretty sure my obsession with furniture is starting to rub off on him (at least that is what I am hoping)

Until next time,
*Bonnybee