

 The bookmarks are an idea by my father to promote his book and blog. I gathered some beat-up old paperbacks at the used book store for cheap and covered the fronts with the Bookshopper info and contact paper. Of course I had to be sure to include books from well respected authors... bookmarks of silly romantic novels would tarnish the Bookshopper name!


I wanted to break down the steps of the book planter in case any of you all want to try this fun and unique project!
The original idea came from this website.
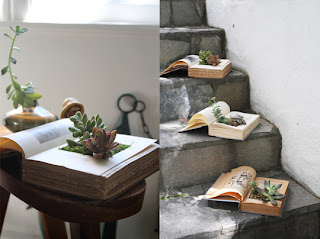 This project is simple but does take some work. First you find a hard cover book to transform. Next cut an opening for you plant to go in. To make this process easier I glued the pages together along the stacked pages side with regular craft glue. The opening should be a few inches wide and deep enough to fit your plant in. Sidenote: the best plants for this project are succulents which need minimal watering because there is no drainage in these. I cut through the pages with an exacto knife. It was a messy process and took awhile but definitely worth it.

 After the hole is deep enough, you need to water proof it. I sprayed some spray adhesive in the hole and lined it with plastic wrap. I tucked the plastic wrap ends under the first page and glued it down so you wouldn't see any of it. (Sorry no pics of this step) Next add soil and your plant. I also added some decorative moss because I like the look of the soil covered.

So what do you guys think? I was so jealous of my dad getting to keep it in his living room after I saw how cool it turned out. Making another one for my apartment is definitely on my list of things to do. Any of you wanna make one?
Until next time,
*Bonnybee


