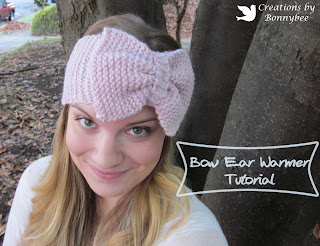
A few weeks ago a college friend of mine sent me a photo of an adorable ear warmer she thought I could knit for her. Never wanting to disappoint anyone who supports my craftiness, I got to work. I thought I would share a tutorial for how I did it because it was super easy and it would be perfect for some last minute Christmas gifts!
For supplies you will need some worsted weight yarn (It didn't even take me half a ball to make this), knitting needles (I used size 8), a measuring tape, a large hole needle, and some time relaxing on your couch.
This pattern only uses a basic knitting stitch so it is super easy and quick. First you need to knit three pieces for your ear warmer.
The longest piece is for the headband and is a long rectangle. I cast on 20 stitches and knitted until was the desired length. No need to check your gauge and you can use whatever yarn or size needle you want, just make the finished product 4.5" wide and 14" long. After you make this piece cast off and start your next piece. Next for the bow I cast on 22 stitches and made a rectangle that measured 5" wide and 6.5" long. And lastly a little piece (cast on 5 sts) that measures 1" wide and 4" long.
Now it's time to assemble your pieces.
1. To make the instructions easier, I have labeled the pieces. A is the long rectangle that will make the headband. B is the piece to make the bow. C is the small strip that will tie everything together. If you haven't done it already, weave in all the lose ends of your pieces.
2. First take piece A and stitch together the two short sides of the rectangle. Do this with a new piece of yarn and don't worry about it looking pretty, it won't be seen.
3. To make the headband cinch in a little so you can add on your bow, pull the ends of your string that you just sewed with to gather the fabric a little. Then tie a knot with each end and snip off the excess. Again this won't be seen but you just need it to be secure because it will get tugged on when you stretch it around your head.
4. Now we will work with piece B for a moment. With a new piece of yarn run a loose stitch through the middle of the rectangle and pull on the ends to gather it (like you did with the last piece). Don't pull too hard, just enough to where the rectangle transforms into a bow shape.
5. Tie off the ends by wrapping them around the center of the bow and making a knot.
6. Now it's time to put it all together! Lay piece B on top of piece A with the centers matching. Then take C and wrap it around the center of the two pieces. Stitch the two short ends of C together tightly and tie off the ends. Then slide the stitched up side of C to the inside of the headband so you can't see it. I also added one quick stitch through all three layers to make sure they all stay in place.
You're done! Now you have a cutsie bow ear warmer that took hardly any time at all! If you aren't a big fan of the bow, leave out piece B and just make a cinched headband!
Any questions or suggestions for the tutorial? Any of you going to try this one out? Please let me know in comments below!
*Bonnybee


